
By Seppe Renty – Data Engineer
Hello, I’m Seppe Renty a Data Engineer at InfoFarm. In this Blogpost I will give a short introduction on User and Access management in AWS. More specifically I will focus on two AWS services which are built to fit this purpose: Identity and Access Management (IAM) and Lake Formation (LF). Both services exist to ease the process of setting up access management of your data platform. However, both services obviously serve a different purpose.
What Topics will be covered?
I’ll give a brief overview of both services before discussing their technical specs. For IAM, I’ll provide a quick tutorial on how to start and for Lake Formation, I’ll show you the process of setting up simple row and column level security for your data lake. Lastly, as a bonus, I will quickly demonstrate how to set up Row-level security in QuickSight.
AWS Identity and Access Management (IAM)
IAM is an AWS service that enables you to control access to AWS resources. You can create and manage users, groups, roles, and grant permissions to access specific AWS resources such as Glue jobs, Lambda functions etc.
Some key concepts of IAM are:
- Users: A human or workload identity in AWS configured with an IAM user to access other AWS services.
- Groups: A collection of IAM users.
- Roles: An IAM identity with specific permissions, which can be attached to users, groups and resources.
- Policies: Specific permissions to a resource, which are attached to IAM identities such as users, groups, or roles.
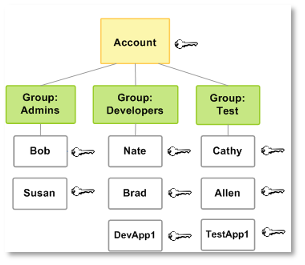
Users and Groups
Users and groups work intuitively. You can have multiple users in one group. Policies can be assigned to individual users or groups.
Roles
This is similar to an IAM user. Instead of being attached to one user or group, this role can be assumed by things that need it Hence, you can group permissions in roles and let them be assumed by multiple users, groups, Glue jobs, Crawlers etc. More about roles can be found here: https://docs.aws.amazon.com/IAM/latest/UserGuide/id_roles.html
Policies:
Policies are essential for IAM permissions as they determine the access rights. These are two main types:
Identity Based Policies: Permissions set in JSON, linked to a particular identity, that control what actions the identity can take on a given resource.
Resource-Based policies: Permissions set in JSON, connected to a specific resource, that control what actions an assigned identity can take on it.
In short, resource-based policies regulate access to a single resource while identity-based policies manage access to one or more resources available to an IAM identity. For more information, see here: https://docs.aws.amazon.com/IAM/latest/UserGuide/access_policies.html
Below you can find an example policy that grants the `getObject` action on a specific S3 bucket: `example-bucket`. On its own, this policy is ineffective; it only takes effect when attached to a role or identity:
{
    "Version": "2012-10-17",
    "Statement": [{
        "Effect": "Allow",
        "Action": "s3:GetObject",
        "Resource": "arn:aws:s3:::example-bucket/*"
    }]
}
How to use IAM
Creating users, groups and roles in IAM is very straightforward.
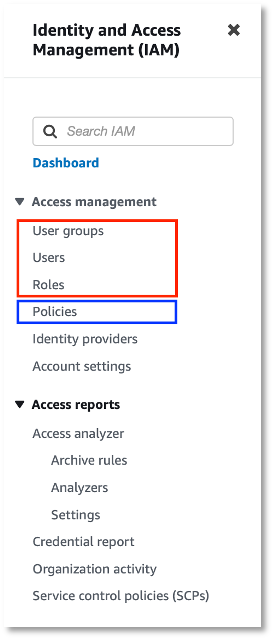
Go to the IAM page in AWS. In the left navigation, select the relevant page, as shown in the red box in the image. Click Add Users, Create Group, or Create Role and follow the screens to proceed.
Once you have an identity, you can attach policies to it. Let’s show how to create a policy and attach it to an identity.
From the IAM dashboard, go to the policies page by clicking in the left-hand navigation. Here you’ll see all existing policies, many of which are auto-generated. To create a new custom policy, click Create Policy.
The steps below show how to create a policy. As an example, let’s take the JSON policy shown before:
{
    "Version": "2012-10-17",
    "Statement": [{
        "Effect": "Allow",
        "Action": "s3:GetObject",
        "Resource": "arn:aws:s3:::example-bucket/*"
    }]
}
You can create this policy by simply providing the JSON, however, for more complicated policies this can be error prone. To create this policy using the AWS UI, make sure that the visual editor tab is selected at the top. We need to specify 3 main things:
- The Service. In our example this is S3.
- The action. The getObject action can be found in the read access level.
- The resource. try to be as specific as possible. In our example we provide the ARN of a bucket.
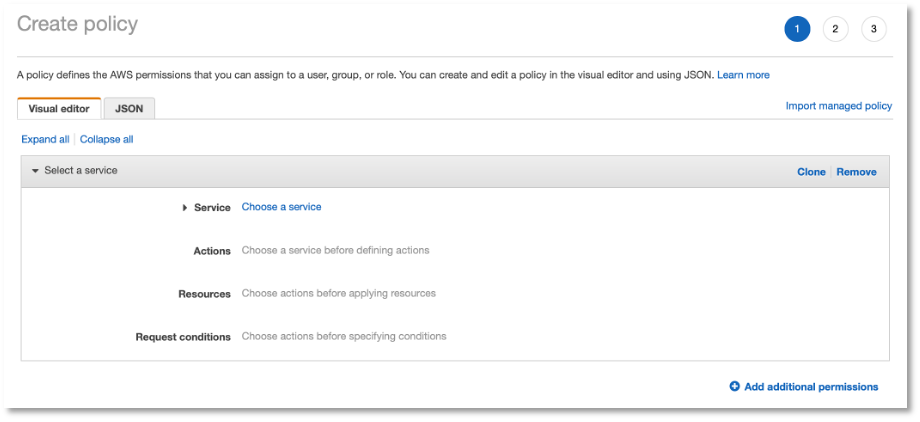
In the request conditions, you can add extra requirements that must be met before permission is granted. This is optional.
After selecting these 3 things, you’ll see in the JSON tab that the same JSON is generated as in our initial example. As said before, if you don’t want to use the UI, you can also provide the JSON directly.
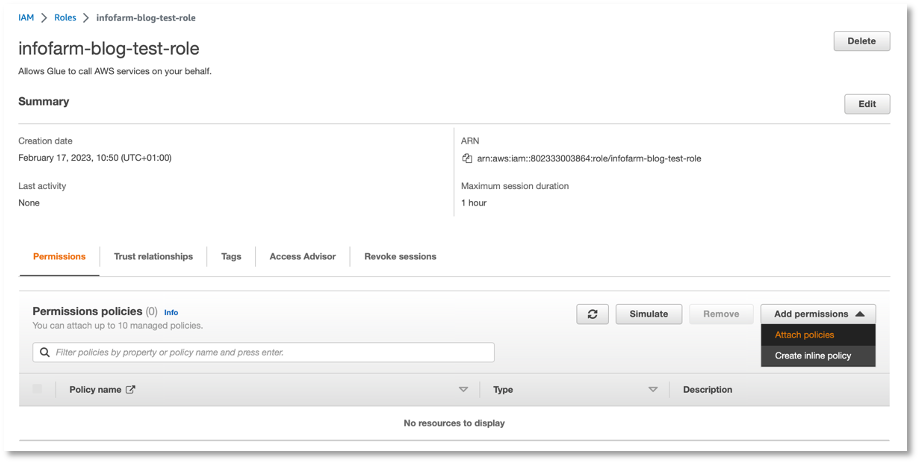
Attaching the policy to an identity is simple. For example, if you want to attach the policy to the role infofarm-blog-test-role, go to the role and click Add permissions, as shown in the screenshot below:
I have demonstrated the fundamentals of IAM above. To learn more, check out the AWS documentation: https://docs.aws.amazon.com/iam/index.html
AWS Lake Formation
Now it’s time to take a look at Lake Formation (LF). IAM manages access to AWS services and resources, while LF secures your data lake. For example, you can specify row and column level permissions in LF – we’ll show this in the rest of this blog post.
Lake Formation is not activated by default. Only when Lake Formation admins are selected in the lake formation page, all new data catalogs will be secured with lake formation. This means that data catalogs which are created before will not be managed with lake formation by default. Once Lake Formation is activated, all data catalogs can be secured on a fine-grained manner. Let’s give some examples on how to provide row / column level permissions.
Column Level permissions
The easiest way to apply column level permissions is by using Lake Formation tags. A LF tag can be attached to entire database or tables, but also to specific columns within a table.
First a LF tag needs to be created. This can be done on the AWS lake formation page under permissions > LF-Tags.
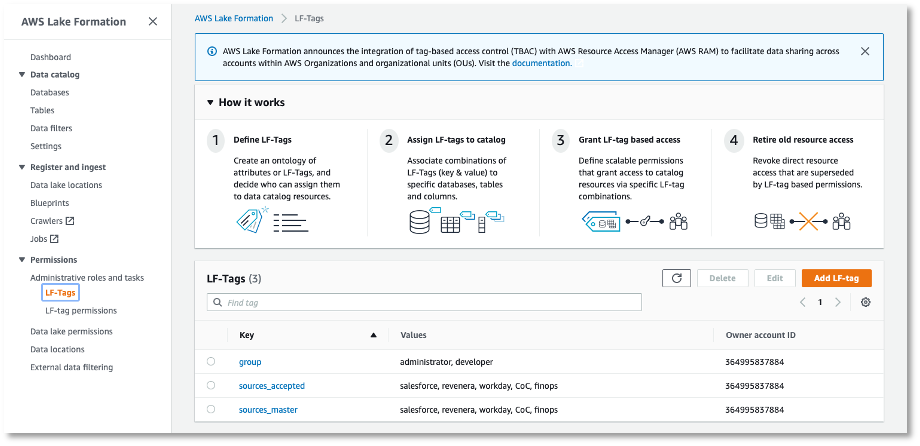
When clicking Add LF-tag, you can create a new tag. An LF tag always has one key and one or more values, e.g., user-type with values admin and developer. Once the tag is created, it will be visible in the table on the LF-Tags page.
The LF-tag can then be attached to databases, tables, and even columns. Tags are inherited by default between a database and its tables or a table and its columns.
To attach a tag to set of specific columns within a table.
Go to Lake Formation > Data catalog > Tables > <table name>, click edit schema, and attach a tag to the set of specific columns.
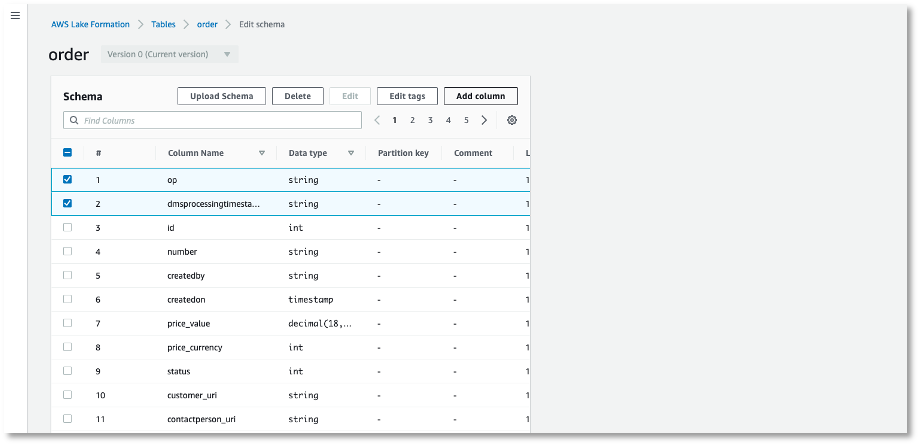
On this page, you can select columns and click Edit Tags. Here, you can choose the value of the tags to attach.
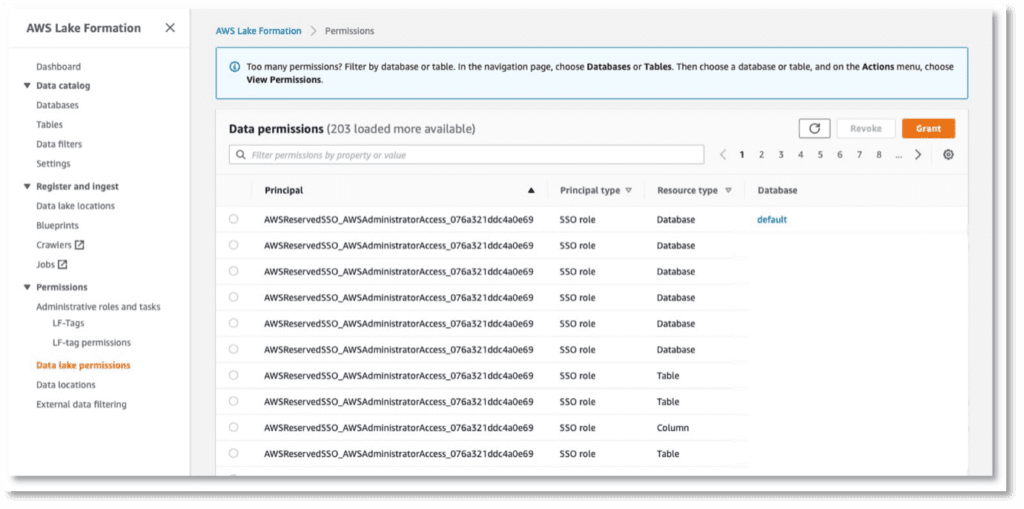
Once the tag is attached to some columns in a catalog table, you can set Lake Formation permissions on it. Specify who can do what with the tagged columns. Do this in Lake Formation under Permissions > Data Lake Permissions.
When you click Grant, a new page opens where you can specify the permissions. Under LF-Tags or catalog resources, select Resources matched by LF-Tags to assign permissions to LF tags.
As you can see, using tags to manage column level permissions is very straightforward. The same tag can be attached to multiple DB’s, tables, columns all over your datalake.
Row Level permissions
Row level permissions cannot be set via Lake Formation tags. Creating them requires a different approach, which is where data filters come in. Here’s how it works:
First, a filter needs to be created, this can be done in Lake Formation > Data catalog > Data filters.
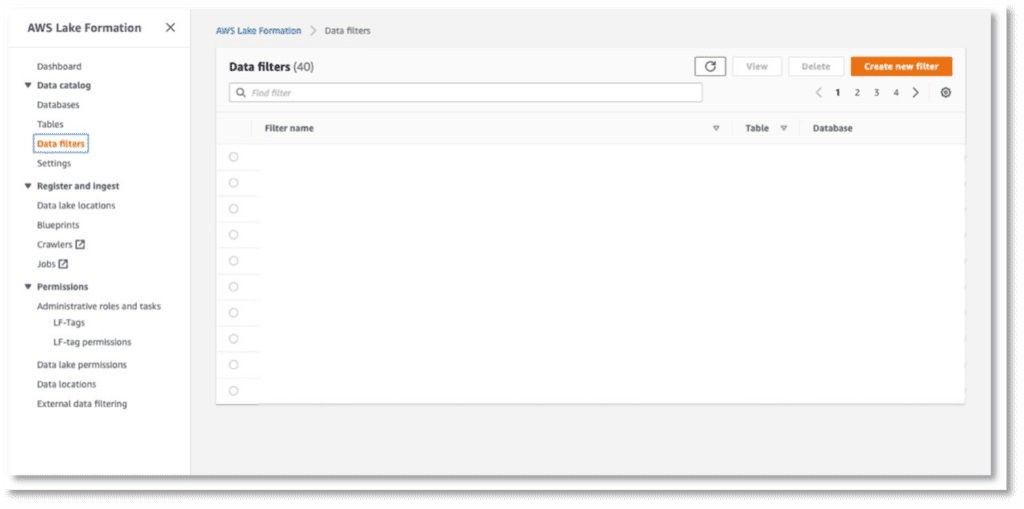
Click Create new filter to create a (you guessed it) new filter. On the popup, provide a filter name, target database and Row Filter Expression. This last expression must be formatted like the part in an SQL statement after: SELECT * FROM table_1 WHERE:
(businessunit='manufacturing') and (billingcountry='germany')
This expression would be used if a certain user can only see rows of data where the column businessunit equals manufacturing and the column billingcountry equals Germany. Once the filter is created, it can be assigned to identities.
Go to Permissions > Data Lake Permissions. Click Grant, here you need to specify the role/user, the database and tables and the Data filter. Finally, under Database permissions, select what permissions the identity has on these resources.

Find out more here: https://aws.amazon.com/blogs/big-data/effective-data-lakes-using-aws-lake-formation-part-5-secure-data-lakes-with-row-level-access-control/
Row level permissions in QuickSight
Once a dataset is shared on QuickSight, all the data is visible to everyone it’s shared with. This bypasses Lake Formation, so row-level permissions must be re-set. You can do this quickly by using another dataset as a permission matrix. To do this, a dataset as shown in the screenshot below, needs to be created:

The origin of this dataset is irrelevant; it can be a file, an AWS catalog,…. The dataset defines what users can view. When a field is blank, all values in the column are visible for that user. In the example above, quisight_user4 can see all rows with medical in the business_unit column regardless of the office value. All columns are case sensitive, this means that the column names need to match exactly to the columns in the actual data.
You need one column to identify the users or groups. The name of this column isn’t important; I chose username.
Once the dataset containing the permissions is created, attach it to the dataset in Quicksight.
Open de dataset and go to summary > row-level-security


Toggle User-based and select the dataset containing the row level permissions for this dataset. A lock symbol will appear on the overview of datasets once the permissions are applied.
More information on creating row-level permissions in QuickSight can be found here: https://docs.aws.amazon.com/quicksight/latest/user/restrict-access-to-a-data-set-using-row-level-security.html
To conclude, in this blog I gave a brief introduction to IAM and Lake Formation. For IAM, I showed how to get started by creating users and groups with different permissions, such as granting access to certain S3 buckets. This helps ensure that only authorized personnel have the ability to make changes or view sensitive data. For Lake Formation, I demonstrated creating column/row level permissions on the data lake so that only authorized users can access specific information within your master data. This allows for much finer control of who has access to which parts of the data lake. Lastly, I illustrated setting these permissions in QuickSight so that user access is properly managed when working with reports in this platform. This ensures user access is maintained throughout all stages of the process from storage through visualization and analysis.
If you’re excited about our content, make sure to follow the InfoFarm company page on LinkedIn and stay informed about our next blog. Interested in how a data platform would look like for your organization? Book a meeting with one of our data architects and we’ll tell you all about it!
Want to start building your own data platform straight away? Take a look at the InfoFarm One Day Data Platform. A reference architecture in both AWS and Azure. We get you going with a fully operational data platform in only one day! More info on our website.